Thank you so much for your kind words yesterday, they mean so much to me.
It's taken a while to pluck up the courage to have a blog again, after my cardmaking days ended rather sourly! However, as said they are behind me, and so onwards with my new hobby!
I was asked by Allie to add a follower gadget to my blog, so now you can find the following options on the right hand side. Forgot about all the gadgets you can put on here, so thank you for asking.
Sarah, has requested that I post the tutorials that I used when making my Horse, which actually is a brilliant idea, as when I need to refer to them again they will be easier to find on my blog!
So here goes! I will point out though, that I am left handed, so therefore the tutorials are often for just left handers, although fabulous people like PlanetJune make videos for both left and right handed people!
When I begin my Amigurumi, I use a Magic Circle. I did try using a foundation chain, but this always left a small hole in the middle and the stuffing poked through! So now I always use the Magic Ring as it can be pulled fully closed.
This tutorial is from PlanetJune and is for Left Handers, there is a Righthanded version and a video tutorial if you click on this link
How do I make a Magic Ring?
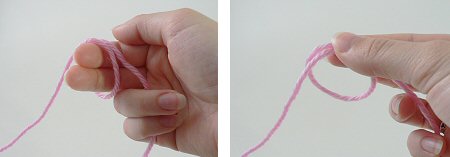
Please note: in the following photos, the starting yarn tail is always on the right and hanging down. The working yarn begins on the left and is then picked up over my right forefinger in Step 2.
- Make a loop a few inches from the end of your yarn. Grasp the join of the loop (where the 2 strands of yarn overlap) between your right thumb and forefinger:
- Insert hook into the loop from front to back. Draw up a loop:
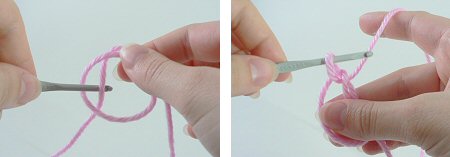
- Ch 1. Note: this does NOT count as a stitch:
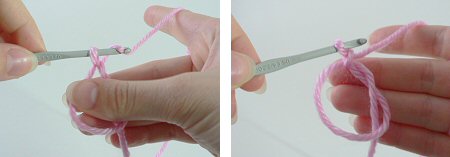
- Insert hook into the loop, so you are crocheting over the loop and the yarn tail. Draw up a loop to begin your first sc:

- Complete the sc. Continue to crochet over the loop and the yarn tail until you have the required number of sc for your first rnd (6 sc shown here):

- Grab the yarn tail and pull to draw the centre of the ring tightly closed:
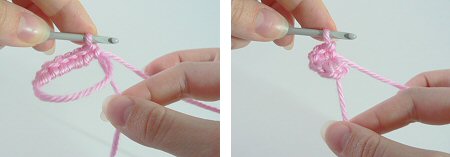
- Begin your second round by crocheting into the first stitch of the first round (below, left). At the end of round 2 your work will look like this (below, right):

So throughout the next couple of days, I'll hunt out the other tutorials I've used and provide the links to them too! I'm sure I'll need them again! Thanks for the suggestions, please keep them coming, and hopefully I'll keep the projects coming too!
That's a great tutorial, very clear! Thankfully crochet is not an expensive hobby with loads of tools, as I can see it in my future ;)
ReplyDelete