Thursday 6 December 2012

First Christmas present finished!

I have a gorgeous little niece who loves Minnie Mouse. I've bought her a lunch box for Christmas with Minnie on, and following the snow fall yesterday I was looking for a hat pattern for myself! But yes of course, I got distracted when I saw this gorgeous hat pattern by Lizzziee crochet on Etsy.

It was so quick and easy to make, even for me!
I can't wait to see it on her! One extra little Christmas present finished!


Tuesday 4 December 2012

Finally started!

I say the same thing year after year, I'll start my Christmas cards early. But as always the last posting dates quickly approach and I still haven't started making them!
So this morning I decided to crack on and make a start! Now I have mountains of Christmas papers left over, and lots of scraps to use up, so here are a couple of sneak peeks at the cards I made this morning!
And yes your eyes are not deceived, there IS a peel off on the card!!!!


Monday 3 December 2012

Its been a while!

Wow, has it really been so long? I have so many things I've made and not shared!
So will try and catch up with some of the projects over the next couple of days. I've downloaded blogger to my phone as the home computer is like one at the library, you have to prebook it! And then you have people reading what you are writing over your shoulder!
So, where were we? Ah yes, making a baby blanket for my Mum, who knows someone whose baby is due soon. We found out she was having a little boy, so I made this gorgeous ripple blank for his arrival.
I also made a cure little hat and booties to go with it. I'll share those with you later!


Saturday 13 October 2012

Despicable Me!

I absolutely adore the film Despicable Me! especially those gorgeous Minions.
They make me laugh so much, and each time I've watched it, I've noticed them doing something else!
So when I saw this beanie pattern on Etsy I just couldn't resist ordering it!
The instructions include a normal beanie or one with earflaps! I wasn't sure this was going to fit Charlie, so I stopped at the basic beanie, it seemed really small when making it up, despite the pattern stating it would fit a 4 to 12 year old. But I can see where you could adjust it to fit. So not a major problem!
But I'm pretty sure Gemma WON'T be asking me to make her one!


And here he is!
It was so quick to make, it only took a couple of hours to sew and finish off.
Plus the added bonus was it only used, single and double crochet!
Charlie had gone to bed when I started making it, he awoke to seeing a yellow hat on the sofa, turned it over and shouted "Minion!" I think him wearing it is a seal of approval!
Just hope he doesn't wear it to rugby in the morning!

I'm still working on the baby set requested by Mum, I've made the bonnet and nearly finished the jacket, but just needed a little break from the endless shells!

Friday 5 October 2012

My first commission!

I've been thrilled with my new hobby!
I've bought a gorgeous crochet hook case, which came complete with 15 crochet hooks in various different sizes, a few of the smaller ones are even metal! I've received my "nappy pin" stitch markers, which have replaced my make-shift paper clip ones, making the whole process so much easier!
And the 1kg bag of toy stuffing has also arrived!

 And I'm pleased to say that last week I received a phone call from my lovely Mum, requesting a Baby Layette Set for a little one due in November. I couldn't resist, so have been making some rather gorgeous baby things!  I'm getting used to crocheting in lines, and not spirals! That means lots of stitch counting, but it's keeping me amused!

I've hunted out quite a few FREE patterns, which I found on Ravelry and the internet, including this one.
 

I absolutely loved the look of the blanket, but after having made the bonnet, the booties and started on the jacket, I've realised there are NO blanket instructions!
But they are gorgeous nonetheless!
I guess in time, when I have a little more crochet experience behind me I will be able to make a pattern myself, as there are many elements in the blanket which are obviously in the other items too.
However, mathematics really aren't my strong point!

So here are the items I've made so far!


The jacket was going really well until sadly I picked it up last night, after a few nights without sleep and tried to sew the shoulder seams together. Sadly I mis-aligned them, and in trying to unpick the stitches, I've ended up cutting into the top row of stitches! I'm not sure if I can salvage it yet, but to save my sanity, it's been temporarily put aside!
I have however, found another pattern which does include a blanket, booties, bonnet and jacket, and have ordered the wool this morning, so hopefully it won't take too long to arrive!

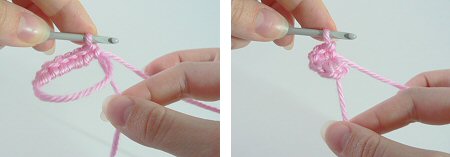
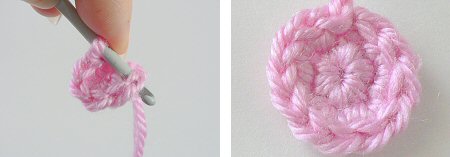
Till then, I'm gonna try and have a go at a tutorial I've found on YouTube, so hopefully I'll be back soon with the results.

Thursday 27 September 2012

A little helping hand

Thank you so much for your kind words yesterday, they mean so much to me.
It's taken a while to pluck up the courage to have a blog again, after my cardmaking days ended rather sourly! However, as said they are behind me, and so onwards with my new hobby!

I was asked by Allie to add a follower gadget to my blog, so now you can find the following options on the right hand side. Forgot about all the gadgets you can put on here, so thank you for asking.

Sarah, has requested that I post the tutorials that I used when making my Horse, which actually is a brilliant idea, as when I need to refer to them again they will be easier to find on my blog!
So here goes! I will point out though, that I am left handed, so therefore the tutorials are often for just left handers, although fabulous people like PlanetJune make videos for both left and right handed people!

When I begin my Amigurumi, I use a Magic Circle. I did try using a foundation chain, but this always left a small hole in the middle and the stuffing poked through! So now I always use the Magic Ring as it can be pulled fully closed.

This tutorial is from PlanetJune and is for Left Handers, there is a Righthanded version and a video tutorial if you click on this link

How do I make a Magic Ring?

Please note: in the following photos, the starting yarn tail is always on the right and hanging down. The working yarn begins on the left and is then picked up over my right forefinger in Step 2.

  1. Make a loop a few inches from the end of your yarn. Grasp the join of the loop (where the 2 strands of yarn overlap) between your right thumb and forefinger:
    magic ring
     
  2. Insert hook into the loop from front to back. Draw up a loop:
    magic ring
     
  3. Ch 1. Note: this does NOT count as a stitch:
    magic ring
     
  4. Insert hook into the loop, so you are crocheting over the loop and the yarn tail. Draw up a loop to begin your first sc:
    magic ring
     
  5. Complete the sc. Continue to crochet over the loop and the yarn tail until you have the required number of sc for your first rnd (6 sc shown here):
    magic ring
     
  6. Grab the yarn tail and pull to draw the centre of the ring tightly closed:
    magic ring
     
  7. Begin your second round by crocheting into the first stitch of the first round (below, left). At the end of round 2 your work will look like this (below, right):
    magic ring
     

  So throughout the next couple of days, I'll hunt out the other tutorials I've used and provide the links to them too! I'm sure I'll need them again! Thanks for the suggestions, please keep them coming, and hopefully I'll keep the projects coming too!

Wednesday 26 September 2012

Yeah or Neigh?

With so much enthusiasm, a heap of wool spilling over the box, and YouTube poised for action, I needed inspiration on what to make!
I knew exactly what, after I found this rather gorgeous Alfalfa the Horse pattern on Ravelry.
If you've never looked on Ravelry before, I highly recommend it, with loads of free patterns, and lots of fabulous designs for just a few pounds each, plus oodles of inspiration!

So, having only really ever mastered the foundation chain, I set about making this little cutie!
I was really surprised just how easy it was! I've used up loads of paper clips, which have made reasonably good stitch markers, until my ones arrive from Japan!
I've gone through so many, mainly because they end up down the back and sides of the sofa!
The ones I'm waiting for are like nappy pins, so hopefully they'll stay in the stitch.

The weather here today has been terribly poor and so the photo is really poor quality, so will hopefully take a few better ones when it brightens up a bit. But hopefully you can see how gorgeous it turned out?

I love all the details, the pattern includes directions to make the reins, lead rope, blanket and there is a saddle too!

I'm so surprised with how well it turned out, I never in a month of Sundays expected it to look anything like the pattern picture! But I'm rather pleased to say it does!
Hope you like it too!
Please give me a Yeah or a Neigh?
I'll be back soon with another project!